

What Are the Steps for Installing and Replacing a Piston Seal?
A piston seal is the linchpin of a hydraulic cylinder, ensuring fluid stays contained and pressure drives motion, whether in a towering crane or a nimble excavator. Installing or replacing one correctly is like tuning a fine instrument—precision prevents leaks, boosts performance, and extends equipment life. A misstep, though, can lead to seal damage, system failure, or costly downtime. This guide walks maintenance technicians, equipment owners, and hydraulic engineers through the step-by-step process of installing and replacing piston seals, emphasizing best practices and common pitfalls. From preparation to testing, we’ll cover tools, techniques, and tips to get it right. Plus, we’ll point you to JSP Seal Kits for high-quality seal kits that make the job easier. Whether you’re maintaining a hydraulic press or repairing a bulldozer, this resource will help you install seals with confidence, keeping your machinery humming.
Understanding Piston Seals and Their Importance
Piston seals are dynamic components in hydraulic or pneumatic cylinders, sealing the gap between the piston and cylinder bore. They prevent fluid leaks, maintain system pressure, and block contaminants, enabling smooth operation in equipment like loaders, presses, or aircraft landing gear. Made from materials like polyurethane, nitrile rubber, PTFE, or fluorocarbon, seals must withstand pressure, friction, and fluid exposure.
Proper installation is critical. A well-installed seal ensures leak-free performance and durability, while a poorly installed one might tear, leak, or fail prematurely, risking cylinder damage or system downtime. Replacing a worn or damaged seal restores efficiency and prevents secondary issues like fluid contamination or scored bores. By following a structured process, you can ensure seals perform reliably, saving time and costs.
Why Proper Installation and Replacement Matter
Installing or replacing a piston seal isn’t just a routine task—it’s a safeguard for your equipment. A correctly installed seal maintains pressure, reduces friction, and protects the system from contaminants, extending cylinder life. For example, a new seal in a hydraulic excavator ensures the arm moves with precision, avoiding sluggish performance. Conversely, improper installation—such as overstretching or misaligning the seal—can cause immediate leaks or early wear, leading to downtime or repairs.
Replacing a failing seal promptly prevents cascading damage. A worn seal might allow fluid to leak, reducing efficiency, or let dirt enter, abrading the cylinder. In high-stakes applications like aerospace or heavy construction, seal failure could halt operations or compromise safety. Mastering the installation process ensures your equipment runs smoothly and reliably.
Preparation for Seal Installation or Replacement
Before touching the cylinder, thorough preparation sets the stage for success. Here’s how to get ready:
Gather Tools and Materials
You’ll need:
- Calipers or micrometers for measuring seal and cylinder dimensions.
- Seal installation tools (e.g., sizing cones, installation rings) to avoid stretching.
- Clean lint-free cloths and isopropyl alcohol for cleaning.
- Hydraulic fluid compatible with the system.
- Torque wrench for precise bolt tightening.
- Soft mallet or plastic hammer for gentle tapping.
- Flashlight and magnifying glass for inspection.
- Replacement seal kit (e.g., from JSP Seal Kits) matched to your equipment.
Verify Seal Specifications
Check the equipment manual or part number to confirm the seal’s material (e.g., polyurethane, PTFE), dimensions, and design (e.g., U-cup, compact). Ensure the new seal matches the system’s pressure, fluid, and temperature requirements. For example, use fluorocarbon for high-heat chemical systems or nitrile rubber for oil-based hydraulics.
Inspect the Work Area
Set up a clean, well-lit workspace to prevent contamination. Cover surfaces with clean cloths and avoid dusty or greasy environments. Contaminants like dirt or metal shavings can damage the new seal or cylinder.
Review Safety Protocols
Depressurize the hydraulic system completely to avoid injury. Wear gloves and safety glasses to protect against fluid exposure or sharp edges. Ensure the equipment is locked out and tagged out to prevent accidental activation.
Check Cylinder Condition
Inspect the cylinder bore and piston for scoring, corrosion, or wear. A damaged bore can tear the new seal, while a worn piston may cause poor sealing. Polish minor scratches with fine emery cloth if needed, but replace severely damaged components.
Proper preparation minimizes errors and ensures a smooth installation process.
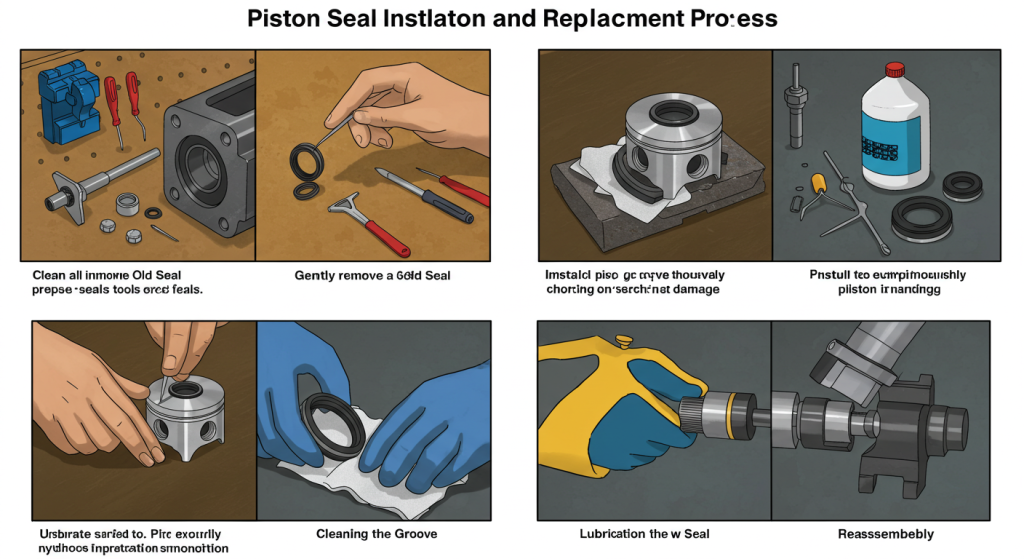
Step-by-Step Process for Replacing a Piston Seal
Replacing a piston seal involves removing the old seal and installing a new one. Follow these steps for a hydraulic cylinder:
Step 1: Disassemble the Cylinder
- Relieve system pressure by opening the bleed valve or cycling the cylinder with the pump off.
- Disconnect hydraulic lines, capping them to prevent contamination.
- Remove the cylinder from the equipment if necessary, following manufacturer guidelines.
- Disassemble the cylinder head by loosening bolts with a torque wrench, keeping parts organized.
- Carefully slide the piston and rod assembly out of the bore, avoiding scratches.
Step 2: Remove the Old Seal
- Locate the piston seal, typically seated in a groove on the piston.
- Use a non-metallic pick or seal removal tool to gently pry the seal out, avoiding damage to the groove.
- If the seal is stubborn, soak it in warm hydraulic fluid to loosen it, but avoid excessive force.
- Inspect the old seal for cracks, hardening, or wear to diagnose failure causes (e.g., heat damage, abrasion).
Step 3: Clean and Inspect Components
- Clean the piston, rod, and bore with isopropyl alcohol and lint-free cloths to remove fluid, dirt, or debris.
- Check the piston groove for burrs or damage; smooth minor imperfections with fine emery cloth.
- Inspect the cylinder bore for scoring or pitting. A mirror finish is ideal—any damage may require honing or replacement.
- Verify the rod is straight and free of nicks, as these can tear the new seal.
Step 4: Select and Prepare the New Seal
- Confirm the new seal matches the original specs (size, material, design). For example, a polyurethane U-cup for a 200-bar system or a PTFE compact seal for high pressure.
- Inspect the seal for manufacturing defects like cuts or molding flaws.
- If the seal is stiff (e.g., PTFE), warm it in hot water (60°C) for a few minutes to increase flexibility, but avoid overheating.
- Lubricate the seal lightly with compatible hydraulic fluid to ease installation.
Step 5: Install the New Seal
- For flexible seals (e.g., polyurethane, nitrile rubber), gently stretch the seal over the piston and into the groove, ensuring it seats evenly without twisting.
- For rigid seals (e.g., PTFE), use a sizing cone or installation ring to compress the seal gradually, preventing overstretching.
- Press the seal into the groove with clean fingers or a soft tool, ensuring it sits flush and isn’t pinched.
- Double-check alignment to avoid gaps or overlaps, which could cause leaks.
Step 6: Reassemble the Cylinder
- Lubricate the piston and bore with a thin layer of hydraulic fluid to reduce friction during reassembly.
- Carefully slide the piston and rod assembly back into the bore, aligning it to avoid scoring.
- Reattach the cylinder head, tightening bolts to the manufacturer’s torque specs with a torque wrench.
- Reconnect hydraulic lines, ensuring fittings are clean and secure.
Step 7: Test the System
- Refill the system with clean, compatible hydraulic fluid, bleeding air from the lines.
- Pressurize the cylinder gradually, checking for leaks around the rod or fittings.
- Cycle the cylinder several times at low pressure to seat the seal, monitoring for smooth operation.
- Perform a pressure test at full operating pressure (e.g., 300 bar for a high-pressure system) to confirm no leaks or performance issues.
- Listen for unusual noises (e.g., hissing) and check fluid levels to ensure proper function.
Step 8: Final Inspection and Cleanup
- Wipe down the cylinder and surrounding area to remove spilled fluid.
- Inspect all connections for tightness and verify no leaks during operation.
- Update maintenance logs with the replacement date, seal type, and system performance notes.
- Dispose of the old seal and used fluid according to environmental regulations.
This process ensures the new seal is installed correctly and the system is ready for use.
Installing a Piston Seal in a New Cylinder
For a new cylinder, the process is similar but skips removal of an old seal. Focus on:
- Verifying Fit: Measure the piston groove and bore to confirm the seal’s dimensions. A mismatch (e.g., too tight or loose) causes leaks or damage.
- Cleaning: Ensure the new cylinder is free of manufacturing debris or oil. Use isopropyl alcohol for a spotless surface.
- Lubrication: Apply a thin layer of hydraulic fluid to the seal and bore to ease installation and reduce initial friction.
- Precision Installation: Use installation tools for rigid seals like PTFE to avoid stretching or tearing. Ensure the seal seats perfectly in the groove.
- Testing: Cycle the cylinder at low pressure first, then test at full pressure to confirm sealing performance.
New cylinders demand extra care to avoid damaging pristine surfaces, ensuring long-term reliability.
Common Mistakes to Avoid
Even seasoned technicians can make errors. Watch out for these pitfalls:
- Overstretching the Seal: Excessive stretching during installation (especially with polyurethane or nitrile rubber) causes tears or poor sealing. Use sizing tools for rigid seals.
- Contamination: Dirt or debris on the seal or cylinder can cause abrasion or leaks. Always work in a clean environment.
- Incorrect Seal Selection: Using a seal unsuited for the system’s pressure, fluid, or temperature (e.g., nitrile rubber in a high-heat system) leads to early failure.
- Misalignment: A twisted or unevenly seated seal leaks or wears unevenly. Double-check groove placement.
- Over-Tightening Bolts: Excessive torque on cylinder head bolts can distort components, affecting seal performance. Follow torque specs.
- Skipping Testing: Failing to pressure-test the system risks undetected leaks or improper seating, leading to immediate failure.
Avoiding these mistakes ensures a durable, leak-free installation.
Tools and Equipment Needed
A well-equipped toolkit makes the job smoother. Essential tools include:
- Calipers/Micrometers: Measure seal and cylinder dimensions accurately.
- Seal Installation Tools: Sizing cones, rings, or sleeves for precise seal placement.
- Non-Metallic Pick: Remove old seals without scratching the piston.
- Torque Wrench: Tighten bolts to exact specifications.
- Clean Cloths and Isopropyl Alcohol: Clean components thoroughly.
- Hydraulic Fluid: Lubricate seals and refill the system.
- Soft Mallet: Tap components gently during reassembly.
- Flashlight/Magnifying Glass: Inspect grooves and seals for defects.
- Bleed Kit: Remove air from hydraulic lines during testing.
For complex systems, a hydraulic press or puller may be needed to disassemble large cylinders.
Maintenance Tips to Extend Seal Life
Once installed, proper care keeps seals performing longer:
- Regular Inspections: Check for leaks or performance issues every 1,000 hours or per manufacturer guidelines.
- Fluid Maintenance: Replace hydraulic fluid and filters as recommended to reduce contamination.
- Wiper Seal Checks: Ensure wiper seals block dirt, protecting the piston seal.
- Temperature Control: Use coolers to keep systems within seal temperature limits (e.g., below 100°C for polyurethane).
- Avoid Over-Pressurization: Operate within the system’s pressure rating to prevent seal extrusion.
- Train Technicians: Ensure staff follow best practices for installation and maintenance.
These habits minimize wear and delay the need for future replacements.
Where to Source Quality Piston Seals
For top-notch piston seals, look to JSP Seal Kits. They offer complete seal kits for brands like Soosan, Furukawa, Atlas Copco, and Montabert, crafted from durable materials like polyurethane, PTFE, fluorocarbon, and nitrile rubber. Their seals are built for tough hydraulic applications, ensuring reliable performance under pressure. JSP provides expert guidance to match seals to your equipment’s specs, plus fast delivery to reduce downtime. Whether you’re repairing a hydraulic breaker or a crane, their kits meet OEM standards. Share your equipment model or application details, and their team will recommend the ideal solution. Visit JSP Seal Kits for high-quality seals that stand up to the job.
Frequently Asked Questions
How often should piston seals be replaced?
Replacement depends on usage and conditions—typically every 5,000–10,000 hours for polyurethane seals, longer for PTFE with proper care.
Can I reuse a piston seal after removal?
No, seals stretch or deform during use, losing effectiveness. Always install a new seal to ensure proper sealing.
What if I don’t have seal installation tools?
Use clean, rounded plastic tools to avoid damaging the seal, but sizing cones or rings are recommended for precision, especially with rigid seals.
How do I know if a new seal is installed correctly?
A properly installed seal sits flush in the groove without twists or gaps. Pressure testing with no leaks confirms correct installation.
What causes a new seal to fail quickly?
Common causes include improper installation (e.g., overstretching), contamination, incorrect seal selection, or cylinder damage. Follow best practices to avoid these.
Conclusion
Installing and replacing a piston seal is a critical task that demands precision and care. By following a structured process—preparing tools, verifying specs, cleaning components, installing with care, and testing thoroughly—you ensure leak-free performance and system reliability. Avoid common mistakes like overstretching or contamination to protect your investment. Regular maintenance, such as fluid checks and wiper seal inspections, extends seal life and prevents premature failure. For high-quality replacements, explore JSP Seal Kits. Their durable seal kits, made from materials like polyurethane and PTFE, support major brands with expert support and fast delivery. Whether you’re maintaining a hydraulic press or a loader, JSP has you covered. Ready to install a seal that lasts? Visit JSP Seal Kits today for solutions that keep your equipment running strong.