

How to Install or Replace a Hydraulic Breaker Seal Kit
Hydraulic breakers are indispensable in industries like construction, demolition, and mining, delivering the power needed to break through tough materials such as concrete, rock, and asphalt. These robust machines rely on precise internal components, particularly the seal kit, to maintain performance and prevent hydraulic fluid leaks. A seal kit, consisting of O-rings, gaskets, and other sealing elements, ensures the hydraulic system remains sealed, protecting internal parts from contaminants and maintaining pressure for efficient operation. Over time, seals wear out, leading to leaks, reduced performance, and potential damage to the breaker.
Replacing a hydraulic breaker seal kit is a critical maintenance task that can restore functionality, extend equipment life, and prevent costly downtime. While the process requires care and attention to detail, it’s manageable with the right tools, preparation, and high-quality replacement parts. This comprehensive guide provides a step-by-step approach to installing or replacing a breaker seal kit, along with tips for success and preventive maintenance strategies. Drawing on expertise from trusted suppliers like JSP Seal Kits, we’ll cover everything you need to know to keep your breaker in top condition. Whether you’re a seasoned technician or a first-time maintainer, this article will equip you with the knowledge to tackle seal kit replacement confidently.
Why Replacing a Seal Kit Matters
A hydraulic breaker’s seal kit is essential for maintaining a tight seal within the hydraulic system, preventing fluid leaks, and protecting against contaminants like dirt, dust, or water. Worn or damaged seals can lead to:
- Hydraulic Fluid Leaks: Leaks reduce the breaker’s power, increase fluid costs, and pose environmental risks.
- Contamination: Debris entering the system can damage the piston, cylinder, or valves, leading to costly repairs.
- Reduced Performance: Pressure loss from failing seals weakens impact force and slows operation.
- Equipment Failure: Unaddressed seal issues can cause catastrophic damage, requiring extensive repairs or replacement.
Timely seal kit replacement prevents these problems, ensuring reliable operation and minimizing downtime. Using high-quality, OEM-compatible seal kits from suppliers like JSP Seal Kits guarantees durability and compatibility, making the replacement process more effective.
Tools and Materials Needed
Before starting, gather the necessary tools and materials to ensure a smooth replacement process:
- Tools:
- Wrenches and screwdrivers (specific sizes depend on your breaker model).
- Seal installation tool (to prevent damage to new seals).
- Non-metallic pick or plastic tool for removing old seals.
- Clean rags or lint-free cloths.
- Mild solvent (approved by the manufacturer) for cleaning.
- Torque wrench for precise bolt tightening.
- Materials:
- Replacement seal kit compatible with your breaker’s make and model, available from JSP Seal Kits.
- Hydraulic fluid (check the manual for the recommended type and volume).
- Container for catching drained fluid.
- Documentation:
- Breaker’s service manual for model-specific instructions, seal locations, and torque specifications.
- Safety Gear:
- Gloves, safety glasses, and protective clothing to prevent injury.
- Lockout/tagout equipment to ensure the breaker is safely powered off.
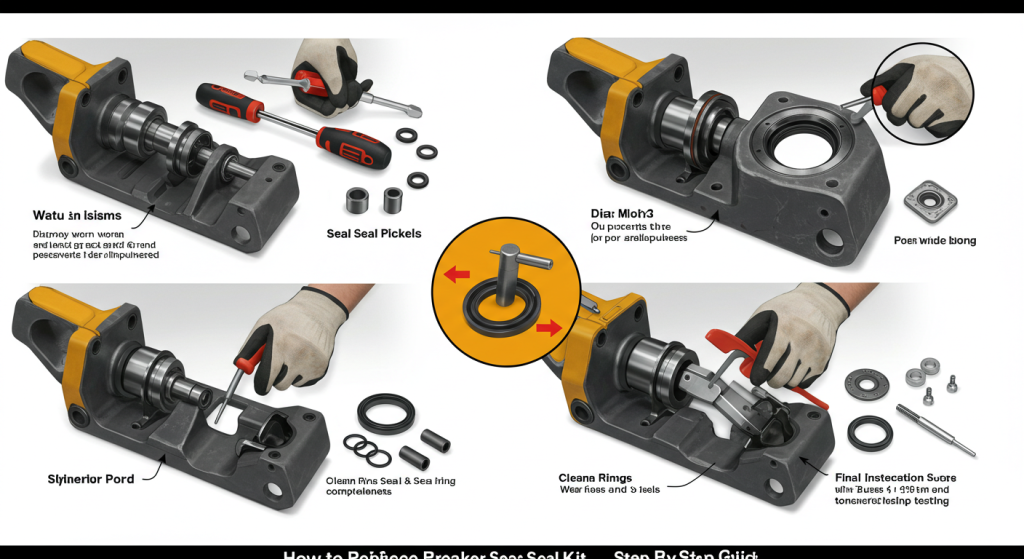
Step-by-Step Guide to Installing or Replacing a Breaker Seal Kit
Follow these detailed steps to replace your hydraulic breaker’s seal kit safely and effectively. If you’re not experienced with breaker maintenance, consider consulting a professional technician to avoid costly mistakes.
Prepare for Replacement
Proper preparation sets the stage for a successful seal kit replacement.
- Ensure Safety: Turn off the breaker, depressurize the hydraulic system, and disconnect it from the power source. Use lockout/tagout procedures to prevent accidental startup.
- Set Up a Clean Workspace: Work in a well-lit, clean area to avoid contaminating the hydraulic system. Dust or debris can damage new seals or internal components.
- Verify the Seal Kit: Confirm that the seal kit from JSP Seal Kits matches your breaker’s make and model. Check that it includes all necessary O-rings, gaskets, and seals, and inspect for manufacturing defects.
- Review the Manual: Study the breaker’s service manual for specific disassembly instructions, seal locations, and torque requirements. Each breaker model may have unique procedures.
Drain the Hydraulic System
Draining the hydraulic fluid prevents spills and ensures safe disassembly.
- Place a Container: Position a clean container under the breaker to catch the fluid.
- Drain the Fluid: Open the drain valve or remove the plug (as specified in the manual) to drain the hydraulic fluid completely.
- Dispose Properly: Store the used fluid in a sealed container and dispose of it according to local environmental regulations.
- Inspect the Fluid: Note the fluid’s condition. Cloudy, gritty, or discolored fluid may indicate contamination, which could have contributed to seal wear.
Disassemble the Breaker
Careful disassembly allows access to the seal kit without damaging other components.
- Remove the Tool Bit: Detach the chisel or tool bit from the breaker, following the manufacturer’s instructions.
- Disassemble Components:
- Use the appropriate wrenches or screwdrivers to remove bolts, covers, or components to access the seal locations (e.g., piston, cylinder, or valve assemblies).
- Follow the manual’s sequence to avoid misalignment or damage.
- Label components or place them in order to simplify reassembly.
- Clean as You Go: Wipe down exposed areas with a lint-free cloth to prevent dirt from entering the hydraulic system.
- Inspect for Damage: Check the piston, cylinder, and other components for wear, scoring, or damage. If significant damage is found, consult a technician before proceeding, as these parts may need repair or replacement.
Remove Old Seals
Removing worn seals requires precision to avoid damaging surrounding surfaces.
- Locate the Seals: Identify the seals in the piston, cylinder, valve assemblies, or other areas as specified in the manual.
- Carefully Extract Seals:
- Use a non-metallic pick or plastic tool to gently pry out the old seals. Avoid metal tools, which can scratch grooves or components.
- Note the position and orientation of each seal to ensure accurate installation of the new ones.
- Clean Seal Grooves:
- Use a lint-free cloth and a mild solvent (approved by the manual) to remove debris, old fluid, or seal residue from seal grooves and surrounding areas.
- Ensure all surfaces are clean, dry, and free of contaminants.
- Inspect Grooves: Check for scratches, corrosion, or wear in the seal grooves. Damaged grooves may prevent new seals from seating properly and could require professional repair.
Install New Seals
Proper installation of new seals is critical for a leak-free hydraulic system.
- Prepare the Seals:
- Lightly coat each seal with clean, compatible hydraulic fluid to lubricate it and ease installation. Avoid over-lubricating, as excess fluid can attract debris.
- Check the manual for specific preparation steps, such as soaking seals in fluid.
- Install the Seals:
- Carefully place each seal into its designated groove, matching the orientation and position of the old seals.
- Use a seal installation tool or your fingers to press the seals into place, ensuring they are fully seated without stretching, twisting, or tearing.
- For O-rings, ensure they are not twisted in the groove.
- Verify that each seal fits snugly and is properly aligned.
- Avoid Common Mistakes:
- Do not use sharp tools, as they can damage seals or grooves.
- Ensure seals are not pinched or rolled during installation.
- Confirm that you’re installing the correct seal in each location, as kits often include similar-looking components.
- Double-Check: Ensure all seals are installed correctly before proceeding to reassembly.
Reassemble the Breaker
Reassembling the breaker correctly ensures it functions properly after seal replacement.
- Reinstall Components:
- Reverse the disassembly process, carefully reinstalling each component in the correct order.
- Use a torque wrench to apply the recommended torque to bolts and fasteners, as specified in the manual, to avoid over-tightening or under-tightening.
- Check Alignment: Ensure the piston, cylinder, and other components are properly aligned to prevent stress on the new seals.
- Reattach the Tool Bit: Install the chisel or tool bit, following the manufacturer’s guidelines.
- Inspect Connections: Verify that all bolts, covers, and components are secure and properly seated.
Refill and Test the Hydraulic System
Testing the breaker confirms that the new seals are functioning correctly.
- Refill Hydraulic Fluid:
- Fill the hydraulic reservoir with the recommended fluid type, checking the manual for the correct volume and specifications.
- Bleed the system to remove air bubbles, following the manufacturer’s procedure.
- Reconnect the Breaker: Attach the breaker to the hydraulic system and ensure all connections are secure.
- Test the Breaker:
- Start the breaker and operate it at low pressure to check for leaks, unusual noises, or performance issues.
- Gradually increase pressure and monitor impact force, temperature, and fluid levels.
- Inspect all seal areas for signs of leaks during operation.
- Final Checks:
- Verify that the breaker delivers full power and operates smoothly.
- Recheck fluid levels and top off if necessary.
- Ensure no leaks, abnormal sounds, or overheating are present.
- Address Issues: If leaks or performance problems persist, recheck the seal installation or consult a technician.
Document and Maintain
Proper documentation and ongoing maintenance help track the breaker’s condition and prevent future issues.
- Record the Replacement:
- Note the date, breaker model, seal kit part number, and any observations (e.g., component wear or fluid condition).
- Keep a maintenance log to track seal kit replacements and schedule future inspections.
- Schedule Regular Maintenance:
- Follow the manufacturer’s maintenance schedule for fluid changes, inspections, and seal checks.
- Monitor for signs of seal wear, such as leaks or reduced performance, to catch issues early.
Tips for Successful Seal Kit Replacement
To ensure a successful replacement and maximize the lifespan of your new seal kit, follow these best practices:
- Use High-Quality Seal Kits: Source kits from trusted suppliers like JSP Seal Kits, which offers durable, OEM-compatible kits designed for specific breaker models. High-quality materials withstand extreme conditions and provide long-lasting performance.
- Maintain a Clean Workspace: Contamination is a leading cause of seal failure. Keep tools, hands, and the workspace clean to avoid introducing dirt or debris into the hydraulic system.
- Follow Manufacturer Guidelines: Always refer to the breaker’s service manual for model-specific instructions, as seal locations and installation procedures vary.
- Work Carefully: Avoid rushing the process, as mistakes like damaging seals or misaligning components can lead to leaks or equipment failure.
- Check for Component Wear: During disassembly, inspect the piston, cylinder, and other parts for damage. Addressing wear early can prevent recurring seal issues.
- Seek Professional Help if Needed: If you lack experience, tools, or confidence, or if the breaker shows significant damage, hire a qualified technician to avoid costly mistakes.
- Verify Warranty Requirements: Check if replacing the seal kit yourself affects the breaker’s warranty. Some manufacturers require professional installation for warranty coverage.
Preventive Maintenance to Extend Seal Kit Life
Replacing a seal kit is only part of maintaining a hydraulic breaker. Preventive maintenance can extend the life of your new seal kit and keep the breaker running smoothly:
- Regular Inspections: Check for leaks, monitor fluid levels, and inspect seals during routine maintenance to catch issues early.
- Use High-Quality Hydraulic Fluid: Always use the recommended fluid type and replace it according to the manufacturer’s schedule to prevent contamination and seal degradation.
- Keep the Breaker Clean: Remove dirt, dust, and debris from the breaker’s exterior after each use to reduce stress on seals.
- Monitor Operating Conditions: Avoid operating the breaker in extreme temperatures or harsh environments when possible. Use dust suppression techniques on dusty sites.
- Train Operators: Ensure operators are trained on proper breaker use to minimize unnecessary wear on seals and other components.
- Address Issues Promptly: Fix minor leaks or performance issues immediately to prevent escalation into major problems.
By incorporating these practices into your maintenance routine, you can maximize the lifespan of your seal kit and reduce the frequency of replacements.
Common Mistakes to Avoid
Avoid these pitfalls to ensure a successful seal kit replacement:
- Using Low-Quality Seals: Cheap or incompatible seals may fail quickly, leading to leaks and damage. Always choose high-quality kits from JSP Seal Kits.
- Contaminating the System: Dirt or debris introduced during replacement can cause immediate seal failure or long-term damage. Work in a clean environment and use clean tools.
- Improper Seal Installation: Stretching, twisting, or pinching seals during installation can compromise their effectiveness. Use a seal installation tool and follow the manual’s instructions.
- Ignoring Component Damage: Failing to address wear or damage in the piston, cylinder, or grooves can lead to recurring seal issues. Inspect all components carefully.
- Incorrect Torque: Over-tightening or under-tightening bolts can cause misalignment or leaks. Use a torque wrench and follow the manual’s specifications.
- Skipping Fluid Replacement: Reusing contaminated or degraded fluid can damage new seals. Always replace the fluid during seal kit replacement.
Why Choose JSP Seal Kits?
When it comes to seal kit replacement, quality matters. JSP Seal Kits is a trusted supplier of high-quality, OEM-compatible seal kits designed for a wide range of hydraulic breaker models. Here’s why they stand out:
- Premium Materials: Their seal kits are made from durable, high-performance materials that withstand extreme pressures, temperatures, and conditions.
- OEM Compatibility: Each kit is engineered to meet or exceed OEM specifications, ensuring a perfect fit and reliable operation.
- Comprehensive Kits: JSP Seal Kits include all necessary seals, gaskets, and O-rings, simplifying the replacement process.
- Expert Support: They offer technical support and resources to help you select and install the right seal kit for your breaker.
- Competitive Pricing: High-quality seal kits are available at affordable prices, helping you maintain your equipment without breaking the bank.
Visit JSP Seal Kits to explore their range of seal kits and find the perfect solution for your hydraulic breaker.
When to Seek Professional Help
While replacing a seal kit is manageable for those with mechanical experience, certain situations call for professional assistance:
- Complex Breaker Models: Larger or more intricate breakers may require specialized tools or expertise.
- Significant Component Damage: If the piston, cylinder, or other parts show heavy wear or scoring, a technician can assess and repair them.
- Lack of Experience: If you’re unfamiliar with hydraulic systems or lack confidence, a professional can ensure the job is done correctly.
- Warranty Concerns: Some manufacturers require professional installation to maintain warranty coverage. Check your breaker’s warranty terms before proceeding.
- Persistent Issues: If leaks or performance problems persist after replacement, a technician can diagnose underlying issues.
Contact JSP Seal Kits for guidance or recommendations on professional services in your area.
Conclusion
Installing or replacing a hydraulic breaker seal kit is a vital maintenance task that can restore performance, prevent leaks, and extend the life of your equipment. By following the step-by-step guide outlined above—preparing carefully, disassembling the breaker, removing old seals, installing new ones, and testing the system—you can ensure a successful replacement. Using high-quality seal kits from trusted suppliers like JSP Seal Kits guarantees durability and compatibility, while preventive maintenance practices help prolong seal life and minimize downtime.
Whether you’re a contractor, equipment operator, or maintenance professional, mastering seal kit replacement will keep your hydraulic breaker running at peak performance. With the right tools, attention to detail, and quality parts, you can tackle this task confidently and keep your projects on track. For top-quality seal kits and expert support, visit JSP Seal Kits today and invest in the reliability of your hydraulic breaker.